Construction
-
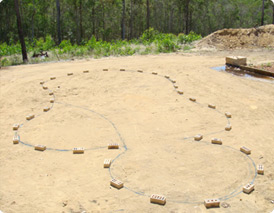
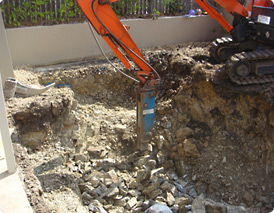
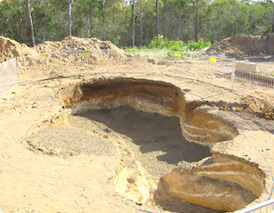
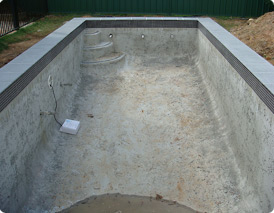
Stage 1: EXCAVATION
Approx time: 1 day
The set-out for the excavation is the first critical part of the construction process. Sometimes the set out is a fairly quick process particularly with freeform pools, however, sometimes the process is quite time-consuming depending on things like squareness to the house and boundaries, critical finished heights and correct clearances form services. Excavation commences once we have agreed the set-out (or outline) with you.
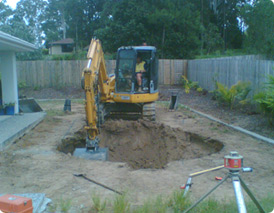
Handy Hint: In most cases the material which is dug up (spoil) has to be transported away from the site. To reduce costs, you might find a suitable “free tip” in your local area where we can take the spoil.
At the end of the excavation, a layer of drainage gravel is spread across the floor of the pool.
-
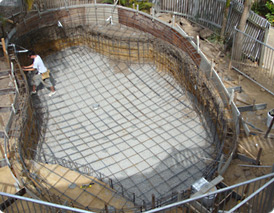
Stage 2: FORMWORK and REINFORCEMENT
Approx time: 1 - 5 days
After the excavation, formwork is placed around the pool up to the height of the finished concrete. We will take great care in accurately placing the formwork as the concretors use this to measure off , giving accurate lines for the inside of your pool shell.
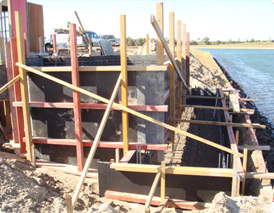
Once the formwork is in place, the steel reinforcing bars are bent and placed inside the formwork and excavation. The correct placement of these steel bars is critical for the strength and longevity of the pool shell, even though in a day or two they will never been seen again.
-
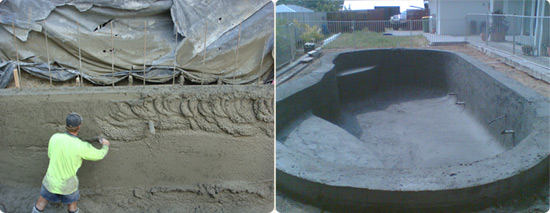
Stage 3: CONCRETE INSTALLATION
Approx time: 1 day plus 4 weeks curing
The process of installing the concrete to a swimming pool is called “shotcrete” or “sprayed concrete”, the process of pneumatically spraying concrete. Typically, the concrete is brought to the site in large trucks, then pumped by a truck-mounted concrete pump to the pool area. At the end of the hose air is introduced to the nozzle and one man carefully sprays the concrete into place. After a few minutes, helpers (concrete shapers) are able to trim and shape the concrete into a form that is suitable for the final finishes.
Handy Hint: Although great care is taken with the concrete process, it is still a somewhat messy process. If at all possible, it is better to delay other trades such as painters and fencers until after the concrete has been placed.
-
Stage 4: PLUMBING
Approx time: 1 day
Once the concrete shell is installed, the plumbing can be installed. This can often be done at the same time as the Stage 5 Coping and Tiling, or sometimes after. This will not effect the finished product and is scheduled to best suit your project.
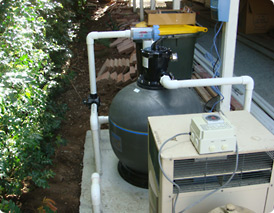
Filtration
There are three types of pool filters: cartridge, sand and diatomaceous earth (D.E.). Each of these filters have advantages and disadvantages, so it is important to have some understanding of this to make your choice of preferred system.-
Cartridge Filters:
Cartridge filters are the most simple and least expensive of pool filters. They are basically just a big fabric element like a car aircleaner. These filters are reasonably efficient as water filters, however they need the most work to maintain as they need to be pulled apart and hosed out. To reduce this maintenance, a filter that is oversized by a factor of 4 would be suitable. Customers who are on tank water may prefer a cartridge filter as there is no backwashing involved. -
Sand Filters:
Sand filters are the most common type of filter in south east Queensland as they are by far the simplest and easiest to maintain, by simply turning a lever to backwash. Many people do not understand that these filters are also the least efficient, so more care is required with chemistry. The regular use of clarifier or water polish is recommended. -
Earth Filters (D.E.):
D.E. filters use a very fine powder as their filter medium making them the most effective of all filter types (about six times finer than a sand filter). This will result in crystal clear water even through the summer heat waves. Unfortunately they are the second most difficult to maintain and the most expensive to maintain. This is somewhat offset by a saving in pool chemicals.
Chlorinators and Chemical Balancers
Most pools require chlorine to kill bacteria as well as acid to lower ph to a level where chlorine is effective. Exceptions to this are ozone pools which are generally not viable in domestic situations. The two common systems are salt chlorinators and chemical feeders like a “Chemigem”.
-
Salt Chlorinators:
Salt chlorination is the process of manufacturing chlorine by electrolysis from salt. This is the most common way of chemically treating backyard pools in S.E. Queensland. Because of popularity, salt chlorinators are manufactured in large volumes making them quite inexpensive to buy and operate. These days, most salt chlorinators are self cleaning, removing the chore of cleaning the white build-up off their cell. Acid needs to be added by hand to control PH. -
Chemical Feeders ( “Chemigem”):
Chemigem is one brand of chemical feeder. Typically, chemical feeders electronically measure chlorine and PH levels in your pool and automatically add chlorine and acid as required. This ensures more pure water with a more perfect water balance. Unfortunately, these machines are more expensive to install and maintain.
Handy Hint: We are happy to help you with the selection of your plumbing and filtration as it is important to select materials that suit your pool’s conditions, your budget, and the longevity of your pool. We have years of experience in working with the different products over time.
-
Cartridge Filters:
-
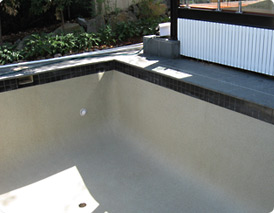
STAGE 5: COPING and TILING
Approx time: 3 day
After the concrete has been placed, the coping (tiles or pavers on the top of the pool) and tiling (some pools have tiles placed around the inside at the waterline) can commence. This is a very important process as you will be looking at the quality of the finishes and workmanship for many years to come. The pool interior can now also be applied.
-
STAGE 6: INTERIOR, FILLING and HAND-OVER
Approx time: 3 day
There are many different pool interiors available in concrete pools, all with advantages and disadvantages.
-
Pebble:
Pebble interiors are made by mixing pebble and cement and trowelling this mix onto the pool shell. This mix is allowed to set a little before the excess cement is hosed off to expose the selected pebbles beneath. These interiors are the most popular as they are the most cost effective and one of the hardest wearing finishes. They are also the least smooth of the available finishes. -
Marbelite or Marblesheen:
Marble is one of the oldest types of finishes in concrete pools. It is much smoother than pebble and usually allows for bluer water colours. It is most suitable in formal pools. The disadvantage is that more care must be taken with water balance to prevent attack from pool chemicals. A monthly trip to a “good” pool shop should prevent any damage. Marble is an economical pool finish, although the cost of waterline tiles needs to be factored in. -
Quartzon:
Quartzon is a pre-bagged and coloured mix manufactured by Riversands at Carbrook. Quartzon is smoother than pebble and not quite as smooth as marble. A wide range of colours are available including some deep blues. This surface also requires great care with water chemistry. Quartzon will add considerable cost to your pool and waterline tiles must be used. -
Fully Tiled Interior:
Fully tiling your pool interior is the ultimate finish for a formal pool. It is the smoothest and toughest of concrete pool finishes. It is the least reactive finish with pool chemicals. Fully tiling allows for the deepest of blues in pool colour. The huge labour content with fully tiling means a higher cost and longer construction time than other pool finishes. The extra cost of tiles is usually recovered at the time of property sale as tiles are seen as a very prestigious finish. Due to the labour content, we may not offer fully tiled interiors at all times of the year.

Handy Hint: We are happy to help you with the selection of tiles, pavers and interior finishes as it is important to select materials that suit your décor, your budget, and the longevity of your pool. We have years of experience in working with different products and finishes over time.
Next, the pool is filled with water. The cost of your pool can include a water tanker which we arrange to come and fill your pool. This takes approximately one day.
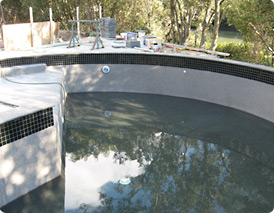
After the pool has been filled with water we vacuum your pool and chemically balance the water. Once we are happy with the job we will make an appointment to hand-over the pool to you. This will take approximately one hour of your time so that we can properly explain the care of your pool.
-
Pebble:
-
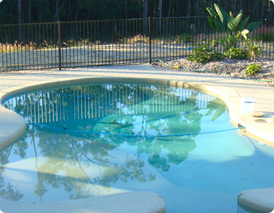
FINAL STAGE : SWIMMING!
Total Project Time: Approx 8-12 weeks**
** project times vary due to weather, access to the site, rock or difficult soil, slopes or unusual spaces, size, equipment, finishings, and changes to requirements